What’s New

Tuesday, February 5, 2013

Meyer Lemon (Delish!) Pound Cake

My brother, Jeff, lives in a beautiful home in Florida.  His garden is spectacular!  And he is so sweet that he mailed me 6 Meyer lemons from the tree in his back yard all the way to California.  Aren't they pretty.  I scrubbed them clean and had them pose for this photo.  They're naturals aren't they. 
I zested them and then juiced them.  (I used some of the juice for Margaritas - they were yummy!)
 Mixed up this creamy, delicious batter in my Kitchen Aid stand mixer.
 Poured it into this 9" glass loaf pan.
 Coming out of the oven - looks so good!
Brushed on the syrup.
 Poured on the glaze.
 Best pound cake ever!  Thank you, Jeff!

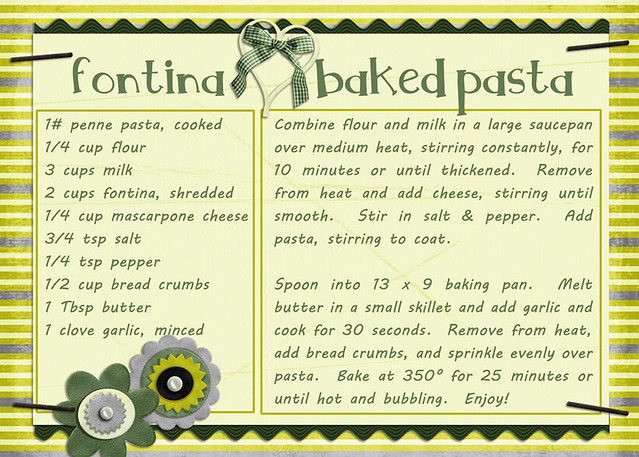
Meyer Lemon Pound Cake

Step 1-cake:
1 3/4 c all-purpose flour
1/2 t baking powder
1/2 t salt
1/4 c sour cream (light is okay)
1 1/2 T Meyer lemon juice
1 1/2 T Meyer lemon zest
1 c sugar plus 2 additional tablespoons
2 sticks (1 c) unsalted butter, softened
5 large eggs, at room temperature, beaten

Step 2-syrup:
1/4 c sugar
1/4 c Meyer lemon juice

Step 3-glaze:
1/2 c powdered sugar, sifted
1 T Meyer lemon juice

Preheat oven to 325 F. Spray a 9×5 loaf pan with non-stick cooking spray.

Combine the flour, baking powder, and salt; whisk to combine. In a separate small container, mix the sour cream and lemon juice together.

In a stand mixer with the paddle attachment combine the zest and sugar and rub together well with your fingertips. Add the butter to the lemon sugar and beat on medium speed until pale and fluffy- 3-4 minutes. Scrape the bowl. Mix in the eggs in 3 additions, beating well after each addition until the mixture is smooth stopping to scrape down the sides of the bowl as needed. Turn the mixer to low and alternately add the dry ingredients in 3 additions and the sour cream mix in 2 additions, starting and ending with the dry and mix at medium-low for about 30 more seconds.

Pour the batter into the prepared pan and smooth the top. Bake the cake for 55-65 minutes, or until a toothpick inserted near the center comes out with just a few moist crumbs. Transfer the pan to a rack and let the cake cool for 10 minutes, then remove it from the pan.

While the cake is in the oven, make the syrup. Combine the sugar and lemon juice in a small saucepan and set over medium-high heat. Cook, stirring frequently, until the sugar dissolves. Bring the mixture to a simmer for 2 minutes, then remove from the heat and set aside.

Once you’ve removed the warm cake from the pan, brush the top and sides with the lemon syrup. It seems like a lot of syrup, but make sure to use it all. Let the cake cool completely, about 2 hours.

To make the glaze: Combine the confectioners’ sugar and lemon juice in a small bowl and stir until smooth. Pour over the top of the cake, covering completely. Let the glaze set for at least 15 minutes before serving.

Inspired by Tracey's Culinary Adverntures.

Sunday, February 19, 2012

Strawberry Ice Cream

Strawberries are in season and Josh loves strawberry ice cream! This will be tonight's dessert. Thought you might like to make your own batch of ice cream! (Click picture for full resolution recipe card.)


(Recipe card made with The Sweet Life from the design team at Scrapable.)

Saturday, October 1, 2011

Homemade Burger Buns

So I woke up this morning and I thought, "I'm going to make my own hamburger buns today." Random, I know. :) But I've always been really interested in making bread. Nothing tastes (or smells) better than fresh-baked bread. When Scot talks about his time in Germany, his fondest memories are eating bread just out of the oven at the local bakery. I did go through a bread machine phase a while back, and while I did like the bread that came out of the machine, it took up a lot of space in my teeny-tiny kitchen. So, I gave it away. But I never stopped dreaming **sigh** about fresh bread.

So, this morning I got up and I said, "I'm making buns." Next stop, is Breadtopia. An amazing site with recipes and videos all about making bread. So, I started. I mixed some milk, sugar, salt and butter (the recipe will be at the end) in a small saucepan and heated it on low to melt the butter. I weighed out the flour and I added the yeast to some lukewarm water and then mixed it all up in my stand mixer with the dough hook (it was very exciting to use the dough hook!) Then I put it in this beautiful, oiled bowl and let it rise for an hour.
(I downloaded the Hipstamatic app to my phone a few days ago and used it to take these photos. I think they're really fun! I need to check out some different film options for it.) After the dough was left to rise for an hour, I punched it down and used my kitchen shears to cut the dough into 2 1/2 ounce pieces for the buns. They're not perfectly round but they ended up being perfectly delish! I ended up with 8 rolls spaced out about 1" apart. The other two are on a separate baking sheet.
I brushed the buns with an egg wash and put them into a 400 degree oven for about 12 minutes.
The end result was bacon avocado cheese burger (bacon leftover from breakfast and avocado from the tree in the backyard) and oven roasted fries. My very picky husband said it was great! I'm very pleased with my first try at making my own hamburger buns.
Here's my recipe:
1/4 c whole milk
1 1/2 tbsp unsalted butter
1 tsp salt
1 1/2 tbsp sugar

2 1/4 tsp active yeast
3/4 c warm water (105-110 degrees)

2 1/2 c unbleached bread flour

1 egg white, room temperature with a splash of water
cornmeal for baking sheet

Heat first four ingredients in a small saucepan and heat until butter is melted and sugar dissolves. Cool to lukewarm (less than 110 degrees.)

Add warm water to bowl of stand mixer (or another large bowl if mixing by hand) and sprinkle yeast over and let sit for 10 minutes until bubbly. Add 2 1/4 c flour and lukewarm milk mixture to the yeasty water and mix on speed 2 for about a minute or two and then slowly add additional 1/4 cup flour and continue beating on speed 2 until dough starts to come together and starts cleaning the side of the bowl (about 2 more minutes.) Dough will be a bit sticky. Coat a glass bowl with oil (I sprayed mine with PAM cooking spray) and add dough, turning to coat with oil. Cover with plastic wrap and let rise until doubled, about an hour.

Punch dough down and divide into 8 equal portions, about 2 1/2 ounces each. Let rest 5 minutes and then flatten into a bun shape with the heel of your palm and place on baking sheet that is sprinkled with cornmeal. Let rise again until doubled in size, 45 minutes or so. Heat oven to 400 degrees. Brush egg wash over buns and bake until bread is 200 degrees inside, about 12 - 14 minutes. Cool on wire rack and try not to eat before the burgers are ready! Enjoy!

Saturday, July 2, 2011

Bourbon Pork Skewars

This week I posted my first recipe to Tasty Kitchen ~ Bourbon Pork. Scot loves this dinner so I thought it would be a good one for starters. Here's the recipe if you'd like to make it. And HERE's my post at Tasty Kitchen! Bon appetit!

(P.S. If you click the card you'll get a bigger version.)

Sunday, March 13, 2011

Cari's coming over for dinner tonight so we have a meatless menu. She loves Fontina cheese, so first is a baked pasta dish with fontina and mascarpone. It's guinea pig night (I've never made this recipe before) but I don't know how it won't be a big hit with her. Here's the recipe.

And I had 3 ripe bananas and one egg so this is what I made with it. I'm sending the leftover muffins home with her so she'll have some breakfast this week. I made these about an hour ago and they came out perfectly. My kitchen smells heavenly at the moment! Have a great week and thanks for stopping by.

Pasta recipe adapted from Cooking Light and Muffin recipe adapted from AllRecipes.com

Saturday, February 5, 2011

Tuesday, January 4, 2011

Beef & Peas

If you're going to add any recipe to your rotation, this is it! It was so good and really easy to make. I made this last night (inspired by The Pioneer Woman's version-here) and it took about 15 minutes from start to finish. I served it over Jasmine rice (and I did leave out the green onions because I didn't have any.) I added the recipe to my online WW builder to calculate the points and it was 8 in the Points Plus plan ~ so reasonable that I ate the leftovers tonight. Delish!


If you click the card, you should get a larger version.